

Launch Programs at Login Without Using the Startup Folder
This tweak allows a program to be launched when the user logs onto the computer. It can be set to run minimized and there is no trace of the executable in the Startup folder on the Start Menu nor in the Documents and Settings folder accessible via Windows Explorer
[Start] [Run] [Regedit]
Registry Key: HKEY_CURRENT_USER\Software\Microsoft\Windows\CurrentVersion\RunModify/Create the Value Data Type(s) and Value Name(s) as detailed below.
Data Type: REG_SZ [String Value]
// Value Name: [Enter the Name of Program Executable]
Value Data:
[Enter the Path to the Program Executable]
Exit Registry and Reboot
Customize Desktop Icons
IE, My Computer, My Documents, My Network Places!
Right click an empty area of the desktop and choose properties. Select the “Desktop” tab and click “Customize Desktop”.
On the General Tab place a checkmark in the icons you wish to appear on the Desktop.
Hide Users on the Welcome Screen
When you add an account for certain users with Windows XP, their user names will appear on the Welcome Screen. Sometimes a user needs to be added to a Windows XP machine, because he needs access (via the network) to resources on the machine, but he will not be physically logging in on the computer. You can remove his name from the Welcome Screen, while still maintaining the user account.
Start the Registry Editor
Go to HKEY_LOCAL_MACHINE \ SOFTWARE \ Microsoft \ Windows NT \ CurrentVersion \ Winlogon \ SpecialAccounts \ UserList \ Right-click an empty space in the right pane and select New > DWORD
Value Name the new value exactly as the Username Leave the Value data as 0
If you want to enable this user again on the Welcome Screen, either double-click the Username value, and change the Value data to 1, or delete the Username Close the registry editor
Change Search and Run icons in Start Menu
It was impossible to get an Icon Package / Theme that would change ALL the icons in the Start Manu. The Typical Problem would arise with the Search and Run icons (I have disabled the rest…)
A small search in the registry and I managed to identify the “keys” that control the default icons.To change them you need to get in the registry, and that can be done by going to Start > Run (or WinKey+R) and typing “regedit” (yes, without the quotes…)
“Search”
HKEY_CLASSES_ROOT\CLSID\{2559a1f0-21d7-11d4-bdaf-00c04f60b9f0}\DefaultIcon
“Run”
HKEY_CLASSES_ROOT\CLSID\{2559a1f3-21d7-11d4-bdaf-00c04f60b9f0}\DefaultIconYou can edit each one by double clicking on the respective file.
How do I delete an “undeletable” file?
Open a Command Prompt window and leave it open. Close all open programs. Click Start, Run and enter TASKMGR.EXE .Go to the Processes tab and End Process on Explorer.exe. Leave Task Manager open. Go back to the Command Prompt window and change to the directory the AVI (or other undeletable file) is located in. At the command prompt type DEL where is the file you wish to delete. Go back to Task Manager, click File, New Task and enter EXPLORER.EXE to restart the GUI shell. Close Task Manager.
Faster webpage look up
Instead of typing http://www.nitinagrawal.wordpress.com you can just type anysite then press ctrl+Enter and it automatically puts in the http:// and the .com
nitinagrawal.wordpress + “ctrl+Enter” = http://www.nitinagrawal.wordpress.com
Alphabetizing your Start Menu
If you’re like me you’ve probably installed lots of programs, so many in fact that if you go to try and find a program its actually becoming really hard because they’re not alphabetized, new programs are stuck on the end, so forth and so on, well, this is a really quick, reallllly easy tip to organize your start menu in Windows XP (I think this also works in Win 98, but I’m upgrading my comp that has Win 98 and can’t verify it). Here are the steps:
1.First click on the start button
2.Move your mouse to “All Programs”
3.Move your mouse to any of the folders there
4.Right Click
A box will open up, scroll to “Sort By Names” and click
On-screen Keyboard
1.Go to start
2.Go to run and type OSK
3.Then the keyboard comes on
Remove start-up items
Having programs run when windows loads slows down your start.
There are two ways do disable programs that may be in your startup (like icq, messanger,)
The easiest is to do the following:
1. start –> run –> msconfig
2. Click on the “startup” tab (furthest right)\
3. Unclick any items you don’t want to load when windows starts.
The second is by deleting registry entrys, this can be done the following way:
1. Start –> run –> regedit
2. Navigate to : HKEY_LOCAL_MACHINE\SOFTWARE\Microsoft\Windows\CurrentVersion\Run
HKEY_CURRENT_USER\SOFTWARE\Microsoft\Windows\CurrentVersion\Run
3. Delete any entry’s that you don’t want to load up
***NOTE***
Deleting keys from the registry will not allow you to set them to startup again if you change your mind. **********
Change Orginal Desktop Wallpaper
This is more of a fun tweak than it is useful.Go to run, type regedit press ok.when that comes up go to HKEY_CURRENT_USER>Control Panel>Desktop Now find the orginalwallpaper, right click and select modify.In the text box type the path to the file you want to be your orginal desktop wallpaper.
Disable XP Boot Logo
It is possible to disable XP splash screen, which will slightly speed up the overall boot process. Be aware that removing the splash screen will also cause you not to see any boot-up messages that might come up (chkdsk, convert … ), but if your system runs without any problems then it should not matter.
1. Edit boot.ini
2. Add ” /noguiboot” right after “/fastdetect”.
(or check the /noguiboot switch in msconfig on the boot.ini tab)
Upon restarting, the splash screen will be gone. It can be re-enabled by removing the new switch.
Disable zip folders
Are the ZIP folders too slow for you? Disable it by unregistering the file zipfldr.dll.regsvr32 /u zipfldr.dll
Shortcut Icon for Run
You can put the Run… command found in the Start Menu on the desktop or anywhere else you want
1)Click on the Start Menu
2)Drag the Run… command to the desktop
3)You can then cut and paste it anywhere you like.I put it in my Quick launch toolbar, it saves you a mouse click and possibly a little time.
(Works only in XP style Start Menu not in the classic, and make sure “Enable dragging and dropping” is activated in Start Menu properties.)
Create a Fault Tolerant Boot Disk
Format a floppy in XPCopy ntldr, boot.ini, and netdetect.com to floppy. You will also need bootsect.dos if dual booting and ntbootdd.sys if using scsi.
This will boot XP if startup files are corrupt or if the first disk of a mirror goes bad and you need to boot to the second. It DOES NOT leave you at the command prompt.
Fun with a wheel mouse and IE
Are you interested in browing the internet the fastest way possible? Save time by using keyboard mouse shortcuts desiged for a wheel scroll mouse. Below are a few tips to help you naviagte the web faster
To change the size of the text using your wheel mouse:
Hold down the CTRL button on your keyboard
Scroll the wheel on your mouse up to decrease size of text
Scroll the wheel on your mouse down to increase the size of text
To use you mouse to navigate back and fourth between pages instead of the buttons:
Hold down the Shift button on your keyboard
Scroll the wheel on your mouse up to navigate forward one page
Scroll the wheen on your mouse down to navigate back one page
All of the above tips require a mouse with a scroll wheel
Clear temp files on IEclose
Internet Explorer includes some great security features. For this tweak I will talk about the feature that clear the temporary internet files each time you close internet explorer. This is a very useful feature since it saves disk space and also keeps the websites that you downloaded private. Lets say that you were doing some online banking. All of the HTML files would be downloaded to the temp internet files by default. Someone with few computer skills can then copy those files out of that directory and view them. That is why it is good to have those files cleared automatically.
1.Launch Internet Explorer.
2.Select the Tools from the menu bar.
3.Then select Internet Options… from the drop down menu.
4.Once the internet options has loaded click on the advanced tab.
5.Under security find where it says Empty Temporary internet files folder when browser is closed and check it.
6.Click OK
Make Any Windows Media Player skin Transparent with Nvidia nView Option
This is a little tiny tweak to allow any windows media player skin to become transparent. However, it is made possible with Nvidia. Nvidia has a nView option with some of the latest drivers. It is with this that one can make their windows and stuff transparent. When one right clicks a button in the toolbar you have a nView choice. You do not have this option for windwos media player unless you do this
1. Set your media player to Classic view.
2. Right click the windows media player button on your toolbar, choose nView and select transparent.
3. Change the skin again to your favorite.
4. The new skin should remain transparent unless you close WMP or reboot.
5. Enjoy
Keep high preformance and keep the GUI
To increase system performance and keep the GUI:
1.Right click my computer.
2.Click properties.
3.Click advanced.
4.Click settings (under performance).
5.Click Adjust for best performance.
Scroll to the bottom and check the last one “use visual styles on windows and buttons”.
NOTE: This will switch XP to Classic View
Disable Picture Viewer, but have thumbnails still work
There is a tweak for preventing the picture viewer from opening your pictures by typing “regsvr32 /u shimgvw.dll” at a command prompt. This works, except if you use it, then if you set a folder to thumbnail display mode, your thumbnails will not work.
If you want to disable the picture viewer but would still like to have your thumbnails, then change this in the registry:
HKEY_CLASSES_ROOT\SystemFileAssociations\image\ShellEx\ContextMenuHandlers\ShellImagePreview\(Default)
It should be set to {e84fda7c-1d6a-45f6-b725-cb260c236066} by default… just erase its contents to disable the picture viewer.
Your thumbnails should still work. If you did do “regsvr32 /u shimgvw.dll” at the command prompt, you can undo it by going to the command prompt and typing “regsvr32 shimgvw.dll”
Classic Win2000 Search in XP
Open regedit and navigate to
HKEY_CURRENT_USER\Software\Microsoft\Windows\CurrentVersion\Explorer\CabinetState
Add a new string (REG_SZ) called “Use Search Asst” – set the value to “no” and you will have the classic win2000 search. You dont even have to reboot!
Easier Way of Right-Click to go to Command Prompt
Instead of going through the registry to add a context menu option for opening cmd.exe at any folder, just download the “CMD Line Here” Windows XP PowerToy…
http://download.microsoft.com/download/whistler/Install/2/WXP/EN-
Control Panel Run Shortcuts
The Run dialog gives you easy access to many different programs and options. To get to the Run dialog, click the Start button, then click Run. Type in the command and press Enter, to launch it. For example, type “control folders” (without the quotes) in the Run dialog and press ENTER. Here is a list of commands to use, and what they do:
control – Control Panel
control folders – Folder Options
control userpasswords – User Accounts
control userpasswords2 – Advanced User Accounts
control desktop – Display Properties
control printers – Printers and Faxes
control mouse – Mouse Properties
control keyboard – Keyboard Properties
control netconnections – Network Connections
control color – Display Properties \ Screensaver
control date/time – Date and Time Properties
control schedtasks – Scheduled Tasks
control admintools – Administrative Tools
control telephony – Phone and Modem Options
control fonts – Fonts Folder
control international – Regional and Language
Fast Shutdown and/or Restart From Quick Launch Buttons
This tip will enable you to create buttons in your quick launch toolbar to quickly and easily shut down and/or restart your computer.
1.Right click on your desktop, scroll to new….. shortcut
2.In the location line, for shutdown type; shutdown -s -t 0 ie: shutdown(space)-s(space)-t(space)number zero
3.Name the shortcut “Shut Down PC” or whatever u want
4.The new shortcut is now sitting on your desktop, right click on it and go to properties, then click on “change icon”. Click OK, then pick a suitable icon, there is a red “off button” icon available, then click apply and ok.
5.Now drag the icon from your desktop into the quick launch toolbar, resize the toolbar so all the buttons are visible, then delete the shortcut from your desktop
To create a restart button the location line should read shutdown -r -t 0 name it restart pc and give it a suitable icon for restart
Now you can shut down or restart your pc in 1 mouse click without having to go through the startup menu.
Disable Windows Picture and Fax Viewer
To Disable: Start – Run – regsvr32 /u shimgvw.dll
To Re-Enable: Start – Run – regsvr32 shimgvw.dll
Easy way to add a link to the start menu
If you’re looking for an easy way to adding your favorite link to the start menu, without editing your registry. Simply copy your favorite link from the ‘Favorite’-menu out of Internet Explorer and paste it into the start menu. Done!
Check Disk – Disk Checking Runs Upon Boot
Check Disk runs on every boot: Note – I have seen this happen when Windows File Protection has either been disabled or not allowed to run upon canceling the bootup Check Disk
Go to Start/Run/CMD and type in: fsutil dirty query c:(Modify the drive letter accordingly)
If it comes back as dirty, it hasn’t cleared. For more information go to Start/Run/CMD and type in: CHKNTFS /?
Option: From a command prompt type chkntfs /D and then reboot, a chkdsk should run but not again on next boot
This edit does not work for all users, circumstances depending:
Disable or Enable CheckDisk Upon Boot :
Windows Registry Editor Version 5.00
[HKEY_LOCAL_MACHINE\SOFTWARE\Microsoft\Windows NT\CurrentVersion\Winlogon]“SFCScan”=dword:0000001
[HKEY_LOCAL_MACHINE\SYSTEM\CurrentControlSet\Control\Session Manager]“AutoChkTimeOut”=dword:0000000a
Copy above text and paste in notepad .You just save them with a .reg extension.
Right click on this file and click on merge.
How to add or change a user’s picture in Windows XP?
http://support.microsoft.com/default.aspx?scid=kb;EN-US;q292434
Enable NUM LOCK key for the logon screen
The status of the NUM LOCK key is specific for each user, and it is disabled by default. If you want the NUM LOCK key enabled for use before a user presses CTRL+ALT+DEL to log on (the logon desktop), you need to edit the registry
To enable NUM LOCK for the Logon desktop (shown when no user is logged on), use the steps below:
1.Click Start, Run and type regedit.exe
2.Navigate to the following location:
HKEY_USERS\.Default\Control Panel\Keyboard
3.Double-click the value InitialKeyboardIndicators
4.Set the value-data from 0 to 2
5.Close Regedit
To undo the above, change the InitialKeyboardIndicators value back to 0
Command Prompt – Quick edit mode
Setting this option allows a user to copy and paste text in the command prompt using mouse actions instead of an edit menu. This option makes the command prompt behave more like it did in Windows 2000.
1. Open the command prompt by either clicking Start, All Programs, Accessories, Command Prompt, or by clicking Start, Run then typing in “cmd” and pressing enter.
2. Click on the C:\ icon in the top left and select Defaults.
3. Place a check in Quick Edit Mode and click OK.
Now you can copy text by highlighting it with the left mouse button then clicking the right mouse button. To paste, click the right mouse button again
Creating a Keyboard Shortcut
1. Right-click a shortcut on the desktop or in the start menu, and then click Properties .
2. On the Shortcut tab, click in the Shortcut Key box.
3. Press the key you want to use. Windows will add Ctrl+Alt to it. So if you choose U the combination will be Ctrl+Alt+U.You can also choose one of the function keys you don’t use otherwise, F7 as example. Just one button to click then.
4. Click OK .
Delete Unwanted Screen Savers Loaded w/XP
If anyone else was wondering how to get rid of the annoying Screen Savers that Microsoft feels you have to have with XP they made it a little more difficult than normal.
1. First navigate to “C:\windows\system32\dllcache”. Cut and paste or type in your address bar to get there because it is a hidden folder .
Once there, delete the Screen Savers in that folder . Otherwise, you will find that they will come back no matter how many times you delete them from your system 32 folder.
2. Then you have to go to C: \Windows\system32 and delete the Screen Savers you want to get rid of . (Answer the file protection popups with cancel and yes.)
3. Voila—no more Screen Savers!!!!
Customize Your computer
Get Started Customizing Your Computer
Change Your Desktop Background
Customize Your Mouse and Pointer
Microsoft ClearType Tuner: Customize Your Screen for Your Eyes
Accessibility: 80 How-to Articles
Share a Computer with Fast User Switching
Expand Your Workspace with Multiple Monitors and Dualview
DVD – Enable DVD Player in Media Player
This setting allows you to use Microsoft Media Player to Play and Open DVDs
Start/Run/Regedit:
HKEY_CURRENT_USER\Software\Microsoft\MediaPlayer\Player\Settings. Value Name: EnableDVDUI, Data Type: REG_SZ (String Value), Value Data: yes or no.
Create a new string value called “EnableDVDUI” and set it to “yes” to enable DVD functionality.
Some Shortcut Keys you might enjoy
Windows XP is full of many KEY-Combo Shortcuts to access Feasures quickly. Here are some of the shortcuts you may find most useful.
WINKEY + E
= Opens explorer windows with the folder sidebar enabled
WINKEY + PAUSE/BREAK
= Opens “system propertieS”
SHIFT + DELETE
= Delete a file without sending to Recycler first (NO RECOVERY!)
F5
= Refresh (Usefull in Internet Explorer)
SHIFT F5
= Reload Webpage from scratch (NO CACHE)
CTRL + SHIFT + END
= Highlight everything down a Text page from current possition (USE HOME for up)
ALT + CTRL + DEL
=Ahh, an old favorite.
If an App. is being rude, use this to bring the the “Task Manager” (and kill it if you want). There is some other toys here too like, priorities you can set.
Search “Shortcut keys” under “HELP & SUPPORT” for a complete list of Shortcuts, including these.
Right-click
Lets say you have a bout 4-5 very useful applications which you use always. By placing them all on the first level menu will eventually crowd your start menu. Now why not utilize the right-click option instead? The right-click option gives you the ability to Open, Explore and Find. If you can add a shortcut to your application to that menu, it would be great.
To do this, crank up your registry editor and go to ::
HKEY_CLASSES_ROOT\Directory\Shell.
Right-click on Shell and create a new key. Type in an appropriate name for the key. On the right pane, double-click on the Default value, and add a title with a & character in front of the letter as an accelerator key. Right-click on the key you just created and create another key under it called command . For the Default value of command, enter the full path and program you want to execute in the Value data box.
For example, if you wanted Notepad, you would add that as the first key, the default in the right panel would be &Notepad so when you right click on the Start Button, the N would be underlined and you could just press that key. The command would be something like C:\Windows\notepad.exe. Now when you right click on the Start Button, your new program will show up.
Changing Start button text in Windows XP
I always wanted to change the text of my Start Button ever since I have been using the Windows operating System. It has always been the most difficult of tasks to accomplish with very risky and lengthy activities involving alteration of Windows registry. In fact I could never find of any way to change the Start button text without actually altering the registry values. (If you know of one please let me know so that it can be posted here for others to know, also please let me know if there is a software that does it automatically)
Well the simplest and the least time consuming way of changing the Start button text is described below:
Step1:
You would need to download a small freeware utility called Resource Hacker
Click here to download Resource Hacker
Step2:
Open Resource Hacker utility. Click on File —> Open. Type “explorer.exe” in the text box.
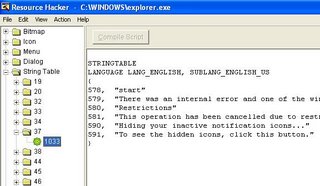
Step3:Expand String Table —> 37 from the tree view and click on 1033 …………
Step 4:From the right window next to where start is written in front of 578 edit the text to what you want on your start button.
Step 5:Click on the “Compile Script” button on top of the right window. Now click on File —> Save as —->PARAS.exe ………………
Step 6: Open registry editor by clicking on Start —> Run and typing “regedit” at the text box. Navigate to HKEY_Local_Machine -> Software -> Microsoft -> Windows NT -> CurrentVersion -> Winlogon……………..
From the right pane double click on shell and replace “explorer.exe” with “PARAS.exe” and then exit registry editor:
Step 7: Restart your computer to see the changes.
Faster and more powerful Internet searching then ever before
1. Get TweakUI for WindowsXP
2. Start -> Programs -> Powertoys for Windows XP -> TweakUI for Windows XP
3. Click the ‘+’ next to ‘Internet Explorer’
4. Hightlight ‘Search’
5. In the right plane click on the ‘Create’ button.
6. For the Prefix, type in ‘Google’ or if you’re REALLY lazy (like me) then just ‘g’
7. for the URL, enter: http://www.google.com/search?hl=en&q=%s&num=100
The ‘hl’ is language, the ‘q’ is the query, and the ‘num’ is the number of results per page. To search for multiple keywords at a time, use the format ‘google monkey+cars’ or just ‘g monkey+cars’ depending how you chose to set it up.
If you use another search engine, then you must have never tried Google
Here are some reasons to help sway you: http://www.google.com/technology/whyuse.html
It has no graphics to load, no popups, no graphical ads, and codes your search terms in bold to prove the pages it lists have all you wanted.
And if that didn’t work, try installing a BSD or *nix type OS, and finding solutions to cryptic error messages using any other search engine.
On request for advanced users only. If you don’t want to use TweakUi, use this registry file or make the according changes manually.
Windows Registry Editor Version 5.00
[HKEY_CURRENT_USER\Software\Microsoft\Internet Explorer\SearchUrl\g]@=”http://www.google.com/search?hl=en&q=%s&num=100″
” “=”+”
“#”=”%23″
“&”=”%26″
“?”=”%3F”
“+”=”%2B”
“=”=”%3D”
Copy and paste into notepad, save as “search.reg”, right click – merge
Better Easy IP Check
Use this if you just want to display your IP address and not the extra information (default gateway / subnet mask)
Simply copy and paste the following into notepad
@echo.
@ipconfig find “IP Address”
@echo.
@pause
And save as IP.BAT (save to your windows dir if you want to be able to access it anywhere)
Now when you type IP you will see:
IP Address. . . . . . . . . . . . : x.x.x.x
Press any key to continue . . .—————————
(information about the code:
@echo. produces a blank line,
@ipconfig find “IP Address” causes the output of ipconfig to be piped to the find command, which looks for the line containing “IP Address”, find then outputs your IP address,
@pause causes the terminal to wait for user input before continuing.
The @ before each command tells the terminal not to echo the command being typed.)
Add a Website link to Start menu
This is a simple registry tweak which adds a website link to your Start Menu…..its very handy for quick access to your favourite website.
To Install : Copy the code below to notepad and save it as link.reg then just right click on it and choose “merge”.
Windows Registry Editor Version 5.00
[HKEY_CLASSES_ROOT\CLSID\{2559a1f6-21d7-11d4-bdaf-00c04f60b9f0}] @=”paras9.blogspot.com”
[HKEY_CLASSES_ROOT\CLSID\{2559a1f6-21d7-11d4-bdaf-00c04f60b9f0}\DefaultIcon] @=”%SystemRoot%\\system32\\shell32.dll,-47″
[HKEY_CLASSES_ROOT\CLSID\{2559a1f6-21d7-11d4-bdaf-00c04f60b9f0}\Instance\InitPropertyBag]
“CLSID”=”{13709620-C279-11CE-A49E-444553540000}”
“method”=”ShellExecute”
“Command”=”paras9.blogspot.com”
“Param1″=http://www.paras9.blogspot.com
To uninstall : Copy the code below to notepad and save as rem.reg and right click and choose merge.
Windows Registry Editor Version 5.00
[HKEY_CLASSES_ROOT\CLSID\{2559a1f6-21d7-11d4-bdaf-00c04f60b9f0}] @=”"
[HKEY_CLASSES_ROOT\CLSID\{2559a1f6-21d7-11d4-bdaf-00c04f60b9f0}\DefaultIcon] @=”"
[HKEY_CLASSES_ROOT\CLSID\{2559a1f6-21d7-11d4-bdaf-00c04f60b9f0}\Instance\InitPropertyBag]
“CLSID”=”{13709620-C279-11CE-A49E-444553540000}”
“method”=”ShellExecute”
“command”=”" “Param1″=”"
Clearing Google Internet Search History
1.Select “Internet Options” from the Internet Explorer “Tools” menu.
2.Select the “Content” tab at the top of the “Internet Options” window.
3.In the “Personal information” section at the bottom, click the “AutoComplete” button.
4.On the AutoComplete Settings window, click on the “Clear Forms” button.
5.You will get a window asking you to confirm clearing the history.
6.Click “OK”, and you’re done.
Note: This is confirmed for use with Internet Explorer, but not MSN Explorer
Customize the New menu
The New menu is a handy tool, but it gets even handier if you customize it by adding your own commands and by removing existing commands that you don’t need.
This is all possible through the Registry
Go to Start >Run> type REGEDIT:
Go to HKEY CLASSES ROOT and then open the .bmp subkey. This subkey includes a ShellNew subkey. The existence of ShellNew tells Windows to include this file type on the New menu. How Windows creates the new file is determined by extra settings (other than Default) in ShellNew. There are four different settings used:
NullFile: When Windows sees this string setting, it creates an empty document of the associated file type. This is the method used by the Bitmap Image (.bmp) and Text Document (.txt) file types.
FileName: The value of this string setting is always a filename. When Windows sees this setting, it looks in the Windows\ShellNew folder for that filename, and then creates the new file by making a copy of the file that’s in ShellNew. This method is used by the Wave Sound (.wav) and WordPad Document (.doc) file types. For the latter, the filename (winword.doc) is defined in the following key:
HKEY CLASSES ROOT\.doc\Wordpad.Document.1\ShellNew
Command: The value of this string setting is a command. When Windows sees this setting, it creates the new document by running the command. This is the method used by the Shortcut (.lnk) and Briefcase (.bfc) file types.
Data: This setting is set to a binary value. When Windows sees this setting, it creates a new document of the associated file type and copies the binary value into the document.
Given all this, it’s relatively easy to add file types to and remove file types from the New menu:
To add a file type to the New menu: In HKEY-CLASSES-ROOT, find the extension subkey for the file type and add a new subkey named ShellNew. Within this new subkey, create a setting using one of the four names discussed above.
To remove a file type from the New menu: In HKEY-CLASSES-ROOT, find the extension subkey for the file type and delete the subkey named ShellNew
Reinstalling Microsoft Task Manager
To reinstall the Microsoft Task Manager:
NOTE: You must be logged on as Administrator or as a member of the Administrators group in order to perform this procedure
1.Click Start , click Run , and then type the following command:
%systemroot%\inf
NOTE : There are no spaces at all in the preceding command line.
2.Click OK to open the INF folder.
3.Locate the file mstask.inf
Right-click the file, and then click Install . This will reinstall the files that Search needs to proceed normally.
You will be asked to place your windows XP cd rom in the drive.
Note# I have only tried on XP Pro
Shutdown XP Faster
Start – Run – Regedit
Navigate to the following Registry key:
1)HKEY CURRENT USER\Control Panel\DesktopDouble click on the AutoEndTasks entry and replace the 0 with a 1 in the Value data text box
For the next two, if the dword value indicated does not exist, create it:
Double click on the WaitToKillAppTimeout entry in the right pane and change the Value data to 2000
Double click on the HungAppTimeout entry in the right pane and change the Value data to 1000
Reboot
If still having a problem, make the next change:
2) HKEY_LOCAL_MACHINE\SYSTEM\CurrentControlSet\ControlRight-click on WaitToKillServiceTimeout and change it to 2000
NOTE: The lowest value Windows will recognize is 1000 (1 second)
Faster startup of Windows XP
If your computer takes a long time to become useable after starting up or logging on, or you want a clean boot of Winodws XP try this,
Click Start > Run > Type “msconfig” > On the Startup tab click Disable All and on the Services tab check the Hide All Microsoft Service box and then click Disable All. Click Restart and Windows XP will restart with only the system services and applications running resulting in a vey fast logon / startup.
This tweak will disable all non-system startup sevices and applications so if you have anything you want to run in the background such as anti virus software do not disable that item.
Faster Dual Boot Timeout
If you dual boot your PC using Windows XP’s dual boot process, you can reduce the timeout period your PC uses before booting to the default OS. This tweak is useful if you boot to the default OS most of the time and only boot to the other OS’s on a limited basis.
1)Locate and Open the hidden file “boot.ini” in notepad or your favorite text editor. This file will likely be in the root directory on the boot partition of your “master” HD. For example, mine is located in “C:\boot.ini” even though I have Win98 loaded on this partition and the boot.ini file was generated when I loaded WinXP on “D:/”
2) Locate the line – timeout=30 (default is 30 seconds). Change this value to any time desired. I chose 10. Be careful not to choose too low of a setting or you may not have time to select your other OS’s. Also, be careful not to change other lines as this may prevent your PC from booting at all.
3)Save the file. The next time you boot your PC, the changes will take effect.
Editor’s note: You can also adjust this in Control Panel > System > Advanced > Startup and Recovery > Settings > Time to display list of operating systems
Disable XP Boot Logo
It is possible to disable XP splash screen, which will slightly speed up the overall boot process. Be aware that removing the splash screen will also cause you not to see any boot-up messages that might come up (chkdsk, convert … ), but if your system runs without any problems then it should not matter.
1. Edit boot.ini
2. Add ” /noguiboot” right after “/fastdetect”.
(or check the /noguiboot switch in msconfig on the boot.ini tab)Upon restarting, the splash screen will be gone. It can be re-enabled by removing the new switch.
Classic Folder Customizer For XP
This tweak allows you to change the background picture of a folder by using the older version of the “Customize This Folder Option” used in the Win9X Os’s and NT/2K. You will require the file IEShwiz.exe from an older version of Windows. You should be able to find it on the internet. If not, there’s not much I can do.
To use this tweak you have to copy IEShwiz.exe into your Windows directory and then edit the registry. Go to HKEY_LOCAL_MACHINE\SOFTWARE\Classes\Directory\shell\ . Create a key called Customize This Folder. Then create a subkey called Command. In Command modify the Default string. Change the line “Value Data” to read IESHWIZ %1
When you rightclick a folder you will now have the “Customize This Folder” option. Click it and a wizzard will open. Just follow the instructions. (If you have Service Pack 1 installed you can only use the folder background and font color customizations. Applying a custom folder.htt requires additional registry editing.)
DOWNLOAD IESHWIZ : http://windowsxp.mvps.org/utils/IESHWIZ.zip
Changing the background of your browsing window:
[{BE098140-A513-11D0-A3A4-00c04FD706EC}]iconarea_image=C:\WINDOWS\Web\Wallpaper\Windows XP.jpg iconarea_text=0×000000
copy above text in notpad & save file as desktop.ini& keep this in ur Drive like in C:\desktop.ini D:\desktop.ini& enjoy give me ur comments
Unable to Open Certain Web Sites? Try
These StepsFrom the IE window,
go to Tools>Internet Options>Advanced and uncheck theoption Enable third party browsing extensions.
Now restart IE.
Go to Start [Run] and type regsvr32 actxprxy.dll (follow next bullet point too)
Go to Start[Run ]and type regsvr32 shdocvw.dll and reboot
Open Tools[Internet Options][Privacy tab] and put one of these web sites in the listwhich can be located by clicking the Sites button.
Try putting the web site in the “Trusted Zone” and if this fixes the problem, you canbegin to diagnose cookie/script problems with that site and your Internet zone settings.
If you are a dial-up user and your ISP have more than one local number for dialup,remove the primary number that is dialing up first and use the secondary dialupnumber. Clear the checkbox for Negotiate multilink for single link connectionsunder the PPP settings
A file in your Windows folder called ‘hosts’ (no extension) may have an incorrect IPaddress for the page. To find out, open Windows Explorer, select your C:\Windowsfolder, and look in the right pane for a hosts file.
If you can’t find it in your Windowsfolder, this isn’t your problem.
If you do find a hosts file, open it in Notepad and lookfor a line referring to the page that’s giving you trouble. If it’s there, enter # at thebeginning of the line.
Save and exit the file
Go to Tools>Internet Options>Connections>Lan Settings.
Uncheck Use a proxyserver. Now restart IE.These steps will definitely solve the issues
Remove “Log Off” from the Start Menu
To remove the Log Off line on your Start menu do the following registry hack.
Navigate to:
HKEY_CURRENT_USER\Software\Microsoft\Windows\CurrentVersion\Policies\ExplorerCreate a new DWORD value and name it NoLogOff.
Now add the value 1 to the key.
You need to logoff or reboot for the settings to take effect
Turn off Welcome screen
Click on start>setting>control panel.Open User Accounts in Control Panel.Click Change the way users log on or off
To change drive letters
To change drive letters (useful if you have two drives and have partitioned the boot drive, but the secondary drive shows up as “D”)Go to Start > Control Panel > Administrative Tools > Computer Management, Disk Management, then right-click the partition whose name you want to change(click in the white area just below the word “Volume”) and select “change drive letter and paths.”
From here you can add, remove or change drive letters and paths to the partition.
How to make your Desktop Icons Transparent?
Go to ontrol Panel > System, > Advanced > Performance area > Settings button Visual Effects tab “Use drop shadows for icon labels on the Desktop”
Remove the Recycle Bin from the Desktop
If you don’t use the Recycle Bin to store deleted files , you can get rid of its desktop icon all together
Run Regedit and go to:
HKEY_LOCAL_MACHINE/SOFTWARE/Microsoft/Windows/CurrentVersion/explorer/Desktop/NameSpaceClick on the “Recycle Bin” string in the right hand pane.
Hit Del, click OK.
How to Rename the Recycle Bin
To change the name of the Recycle Bin desktop icon, open Regedit and go to:
HKEY_CLASSES_ROOT/CLSID/{645FF040-5081-101B-9F08-00AA002F954E}
and change the name “Recycle Bin” to whatever you want (don’t type any quotes).
Speed up your browsing of Windows 2000 & XP machines
Here’s a great tip to speed up your browsing of Windows XP machines. Its actually a fix to a bug installed as default in Windows 2000 that scans shared files for Scheduled Tasks. And it turns out that you can experience a delay as long as 30 seconds when you try to view shared files across a network because Windows 2000 is using the extra time to search the remote computer for any Scheduled Tasks. Note that though the fix is originally intended for only those affected, Windows 2000 users will experience that the actual browsing speed of both the Internet & Windows Explorers improve significantly after applying it since it doesn’t search for Scheduled Tasks anymore. Here’s how
Open up the Registry and goto :
HKEY_LOCAL_MACHINE/Software/Microsoft/Windows/CurrentVersion/Explorer/RemoteComputer/NameSpace
Under that branch, select the key :
{D6277990-4C6A-11CF-8D87-00AA0060F5BF}
and delete it.
This is key that instructs Windows to search for Scheduled Tasks. If you like you may want to export the exact branch so that you can restore the key if necessary.This fix is so effective that it doesn’t require a reboot and you can almost immediately determine yourself how much it speeds up your browsing processes.
Make your Folders Private
Open My Computer
•Double-click the drive where Windows is installed (usually drive (C:), unless you have more than one drive on your computer).
•If the contents of the drive are hidden, under System Tasks, click Show the contents of this drive.•Double-click the Documents and Settings folder.
•Double-click your user folder.
•Right-click any folder in your user profile, and then click Properties.
•On the Sharing tab, select the Make this folder private so that only I have access to it check box
Note:
•To open My Computer, click Start, and then click My Computer.
•This option is only available for folders included in your user profile.
Folders in your user profile include My Documents and its subfolders, Desktop, Start Menu, Cookies, and Favorites.
If you do not make these folders private, they are available to everyone who uses your computer.
•When you make a folder private, all of its subfolders are private as well.
For example, when you make My Documents private, you also make My Music and My Pictures private. When you share a folder, you also share all of its subfolders unless you make them private.
•You cannot make your folders private if your drive is not formatted as NTFS For information about converting your drive to NTFS
Remove shortcut arrow from desktop icons
Here’s how you can remove those shortcut arrows from your desktop icons in Windows XP
1. Start regedit.
2. Navigate to HKEY_CLASSES_ROOTlnkfile
3. Delete the Is Shortcut registry value.You may need to restart Windows XP.
How To Enable Hibernation
Under Windows 98, Me, or 2000 there was an option in the shutdown dialog box to enter the computer into hibernation (where all the content of the RAM is copied to the hard disk).The shutdown dialog box of Windows XP doesn’t offer any longer the hibernation button.Some users may get confused about how to enable the hibernation mode.If this mode is supported by your motherboard (ACPI) you have to do the following:
1.Click Start and Shut Down,
2.Point the standby button and maintain the shift key pushed,
3.A new hibernation button appears: click it while still holding the shift key:
voila your PC will hibernate
Slow Shutdown
Some people have noticed that they are experiencing a really slow shutdown after installing Windows XP Home or Professional. Although this can be caused a number of ways, the most clear cut one so far is happening on systems with an NVidia card installed with the latest set of drivers. A service called NVIDIA Driver Helper Service is loading up on start up and for whatever reason doesn’t shut itself down properly. The service isn’t needed and can also increase the amount of memory available to your system. Here is how to disable it
1: Go into your Control Panel
2: Select Administrative Tools and then click on Services
3: Right click on the file “NVIDIA Driver Helper Service” and then select STOP.
4: To stop this loading up every time you boot up your PC Right click it again and select properties – then where the option “Startup Type” is shown – make sure it is set at Manual
Clean Prefetch Data
The prefetch directory can get full of junk and obsolete links which can slow down yourcomputer noticeably.
I would suggest that you do this once a month or so to improve thespeed.
Do not follow this on a daily basis as prefetching of most commonly used programs will speed up the execution of those programs.
To perform this trick go to:C(SystemDrive):/windows/prefetch, and delete everything and reboot
Change the Default Search Engine from
Microsoft has set the default search engine in Internet explorer as MSN. But here is yourchance to set the default according to your wish.
The tip is from MS-KB. First close theInternet Explorer and open the registry editor (Start[1]Run[1]Regedit).
Then navigate to thefollowing registry key:
HKEY_CURRENT_USER\Software\Microsoft\Internet Explorer\SearchUrl. Change thevalue of the string key named default to any one of the following values:
• To specify Metacrawler as the default search page, change the default value to”http://www.metacrawler.com/crawler?general=%s” (without quotation marks).
• To specify AltaVista as the default search page, change the default value to”http://www.altavista.com/cgi-bin/query?q=%s” (without quotation marks).
• To specify HotBot as the default search page, change the default value to”http://hotbot.com/?MT=%s” (without quotation marks).
• To specify Google as the default search page, change the default value to”http://www.google.com/keyword/%s” (without quotation marks).
• To specify Infoseek as the default search page, change the default value to”http://www.infoseek.com/Titles?qt=%s” (without quotation marks).
• To specify Excite as the default search page, change the default value to”http://search.excite.com/search.gw?search=%s” (without quotation marks).
• To specify Lycos as the default search page, change the default value to”http://www.lycos.com/cgi-bin/pursuit?query=%s” (without quotation marks).
• To specify Magellan as the default search page, change the default value to”http://www.mckinley.com/searcher.cgi?query=%s” (without quotation marks).
• To specify Ask Jeeves as the default search page, change the default value to”http://askjeeves.com/AskJeeves.asp=%s” (without quotation marks).
• To specify Yahoo! as the default search page, change the default value to”http://search.yahoo.com/bin/search?p=%s” (without quotation marks).
• To specify GOTO.Com as the default search page, change the default value to”http://www.goto.com/d/search/?type=topbar&Keywords=%s” (without quotation marks)
Quit Registry Editor, and then start Internet Explorer
Alignment of Start Menu panel
Start menu has all the entries aligned to left by default. But if you insist on aligning it to the right, then here is the way to achieve it. The objective can be met by a registry tweak. Open the registry editor and navigate to the following key:
HKEY_CURRENT_USER\Control Panel\Desktopand look for key MenuDropAlignment.Set its value to 1 to align the menu entry to right. If you have any regrets in future, turn the value back to 0
Type URL without a Mouse Click
In IE you can use Alt + D key combination to highlight the address bar. This allows you to enter a URL without the mouse click. This will be helpful for the laptop users who find it uneasy to use their touchpad every time they want to type a URL
Customize Your Login prompt
So let us get into some serious business.
We shall start with a tip to customize your log in prompt.
Open Registry editor by going to Start[1]Run[1]Regedit and Navigate to the key:HKEY_LOCAL_MACHINE\SOFTWARE\Micrsft\WindowsNT\CurrentVersion\Winlogon.
In right pane, do a right click to create a new string value and give its name LogonPrompt.Set its value to whatever text you want to see displayed at login screen.
Reboot the machine and see the log-in prompt for the change. You can see the text you entered above the text fields that ask for username and password.
Removing the Recovery Console
Restart your computer, click Start, click My Computer, and then double-click the hard disk on which you installed the Recovery Console.
On the Tools menu, click Folder Options, and then click the View tab.Click Show hidden files and folders, click to clear the Hide protected operating system files check box, and then click OK.At the root folder, delete the Cmdcons folder and the Cmldr file.At the root folder, right-click the Boot.ini file, and then click Properties.
Click to clear the Read-only check box, and then click OK.WARNING: Modifying the Boot.ini file incorrectly may prevent your computer from restarting.
Be sure to delete only the entry for the Recovery Console. Also, it is recommended that you change the attribute for the Boot.ini file back to a read-only state after you complete this procedure. Open the Boot.ini file in Microsoft Windows Notepad, and remove the entry for the Recovery Console. It looks similar to this:C:\cmdcons\bootsect.dat=”Microsoft Windows Recovery Console” /cmdcons Save the file and close it.
How to recover from a corrupted registry that prevents Windows XP from starting
click on the link……..
http://support.microsoft.com/default.aspx?scid=kb;en-us;307545
Display The Quick Launch Toolbar
If the Quick Launch Toolbar is missing from the taskbar:Right-click an empty area on the taskbar, click Toolbars, and then click Quick Launch.Add items to the Quick Launch toolbar by clicking the icon for the program you want to add, and dragging it to the Quick Launch portion of the taskbar
How to set, view, change, or remove file and folder permissions in Windows XP
Click on the link ……
http://support.microsoft.com/default.aspx?scid=KB;en-us;q308418
Microsoft Narrator, Magnifier, On-Screen Keyboard
Two of the Accessibility features of XP are Narrator and Magnifier.
To access the features individually:Select [Start] [All Programs] [Accessories] [Accessibility] followed by the feature you want to invoke.
The [Windows Key] + [U] opens the Utility ManagerOther way is open command prompttype osk
Launch Programs at Login Without Using the Startup Folder
This tweak allows a program to be launched when the user logs onto the computer. It can be set to run minimized and there is no trace of the executable in the Startup folder on the Start Menu nor in the Documents and Settings folder accessible via Windows Explorer.
Start] [Run] [Regedit]
Registry Key: HKEY_CURRENT_USER\Software\Microsoft\Windows\CurrentVersion\RunModify/Create the Value Data Type(s) and Value Name(s) as detailed below.Data Type: REG_SZ [String Value] // Value Name: [Enter the Name of Program Executable]Value Data: [Enter the Path to the Program Executable]Exit Registry and Reboot
Administrator Vs User Logon
Power up, a few simple keystrokes and Viola ! – you’re an Administrator in Windows XP. That’s heady stuff. You have the power to make changes to other users’ accounts and can alter any setting in XP that strikes your fancy. The head rush can be so strong that some never want to be just a ‘User’ once they’ve sampled the Administrator strata.However, is always being logged in as Administrator a wise choice? Quite honestly it’s a very foolish choice. If anything goes wrong while you are logged in as Administrator, the same power that you have to make system wide changes can also wreak system wide havoc.
Log in as a User and the potential for damage is reduced. The bottom line; for everyday use, log in as a User and reserve the Administrator account for tasks which require its unique abilities
Create A XP Boot Disk from System Files
As a hedge against being unable to start XP, you can create a boot disk specifically for Windows XP that may allow you to boot the operating system. This can occur when the active partition boot record or other required files become corrupted.
Using Windows XP, place a blank floppy in drive A and format the disk. Navigate to the root folder of the system (in most cases this will be C:\) and copy the following files to the floppy disk
Boot.ini
NTLDR
Ntdetect.com
If you can’t see the files, click [Tools] and [Folder Options...] in the Menu Bar of Windows Explorer. Click the [View] tab and click the radio button next to [Show Hidden Files and Folders]. Remove the check mark next to [Hide Protected Operating System Files (Recommended)] then click [Apply] and [OK]. The files should now be visible in Windows Explorer. If the files still cannot be copied, right click each file, click [Properties] and remove the checkmark from the Read-Only attributes. Reset whatever attributes were unchecked after the copy procedure is completed
In addition to the files listed above, check the same directory for bootsect.dos and ntbootdd.sys files. If they are present on your system, copy them to the same floppy diskette
The disk is used as any other boot disk, inserting it into the floppy drive (A:\) and initiating a cold boot. Make sure the BIOS is set so that the A:\ drive is first in the boot sequence
Create A MS-DOS Startup Disk
Since XP was released there has been a lot of confusion about startup disks, boot disks, and also MS-DOS startup disks.A MS-DOS startup disk is not a substitute for the boot disks that you might be familiar with from Windows 95/98/Me.It performs one function and one function only. It gets you to the A:\ prompt from a cold boot. The following list of files is placed on the MS-DOS startup disk when the procedure listed below is performed
Directory of A:\AUTOEXEC.BAT
COMMAND.COM
KEYB.COM
MODE.COM
EGA.CPI
EGA2.CPIE
GA3.CPI
CONFIG.SYS
DISPLAY.SYS
IO.SYS
KEYBOARD.SYS
KEYBRD2.SYS
KEYBRD3.SYS
KEYBRD4.SYS
MSDOS.SYS
Insert a 3.5 floppy in the floppy drive.Click [Start] [My Computer] then highlight the A:\ drive and right click.Click [Format] to open the window below
Check [Create an MS-DOS Startup Disk] [Start] and follow the prompts.
Note: The MS-DOS startup disk only allows the system to boot into an MS-DOS prompt. The disk contains no additional tools and is not a substitute for Windows XP Setup Boot Disks
Create Legal Notice Logon Dialog Box
In situations where you need users to review a legal notice before logging on, this tweak will create the caption for the notice and the notice itself which you type directly into the string values
[Start] [Run] [Regedit]Registry Key: HKEY_LOCAL_MACHINE\SOFTWARE\Microsoft\Windows NT\CurrentVersion\WinlogonModify/Create the Value Name [LegalNoticeCaption] according to the Value Data listed below.Data Type: REG_SZ [String Value] // Value Name: LegalNoticeCaptionValue Data for LegalNoticeCaption: [Type the Caption for the Dialog Box]Modify/Create the Value Name [LegalNoticeText] according to the Value Data listed below.Data Type: REG_SZ [String Value] // Value Name: LegalNoticeTextValue Data for LegalNoticeText: [Type the Data for the Legal Notice]Exit Registry and Reboot
Use the Address Bar to Launch Programs or Web Pages from the Taskbar
The majority of the time the taskbar is underutilized, simply displaying the names of open programs. Windows XP Professional provides enhanced functionality by allowing you to add the Address Bar to the Taskbar at the bottom of your desktop.Anything that can be launched by the [Start] [Run] command sequence can be done using the Address Bar.Web content can also be launched just as it would be from the Address Bar inside Internet Explorer
To add the Address bar to the taskbar:
Right-click an empty area on the taskbar.Point to Toolbars, and then click Address.Open and close the Address Bar by double-clicking it
Add Your Photo to the Start Menu
At the top of the Start Menu there is a graphic depicting the user signed onto the computer. The pictures are 48 x 48 bitmap images. Create any BMP, GIF, JPG or PNG image and add it to the folder located at:
C:\Documents and Settings\All Users\Application Data\Microsoft\User Account Pictures\Default PicturesBest results are obtained by using a square image
Add Safe Mode Startup to the Boot Menu
It’s fairly common knowledge that if you want to start your computer in Safe Mode you can hit the F8 key during the boot process and it will bring up an alternate list of boot options. The trick is finding just the right place to whap the hell out of the F8 key to make sure the regular boot sequence doesn’t initiate. It’s much easier to get into Safe Mode if you add it to the boot menu as one of the options on the boot loader menu. Here’s how:Make a backup of the current boot.ini file
Note: The boot.ini file shown below is for illustration purposes only. Your actual boot.ini may vary from this example
[boot loader]timeout=30default=multi(0)disk(0)rdisk(0)partition(1)\WINDOWS[operating systems]multi(0)disk(0)rdisk(0)partition(1)\WINDOWS=”Microsoft Windows XP Professional” /fastdetectUsing Notepad, edit the original boot.ini (shown above) so it appears as shown below.[boot loader]timeout=30default=multi(0)disk(0)rdisk(0)partition(1)\WINDOWS[operating systems]multi(0)disk(0)rdisk(0)partition(1)\WINDOWS=”Microsoft Windows XP Professional” /fastdetectmulti(0)disk(0)rdisk(0)partition(1)\WINDOWS=”Microsoft Windows XP Professional Safe” /fastdetect
The line shown above in red is the line you add.I used the word “Safe” but this can be any word you choose.
Close Notepad and save changes when prompted.Start the System Configuration Utility by clicking [Start] [Run] and typing msconfig, then click [OK].
Click the BOOT.INI tab.Highlight the boot line you added with the word “Safe” or whatever word you chose to add above.
Check the /SAFEBOOT option in the Boot Options box and use the radio buttons to add whatever options you prefer. I’d suggest the MINIMAL option.Click [Apply] and [OK] and Restart when prompted.The option to boot into safe mode will now appear on the boot loader menu
Add Computer Management to the XP Desktop
Unlike previous Windows versions, XP takes a minimalist approach to icons on the desktop.The single, default icon a new installation places is Recycle Bin.I certainly don’t like a cluttered desktop so that suits me fine, but one icon I do find indispensable is Computer Management
[Start] [Control Panel] [Performance and Maintenance] [Administrative Tools] Right-Click [Computer Management] then drag and release it over an empty part of the desktop, selecting [Create Shortcut Here] in the context menu that opens.Alternatively, you can use the [Copy] and [Paste] commands rather than dragging and dropping to create the shortcut.
Either method can be used to create shortcuts virtually anywhere once you locate the target file for the desired shortcut
How to Choose Hibernate on the Shutdown Dialog
If hibernate isn’t available from the default Shut Down dialog. It can be enabled by holding down the SHIFT key while the dialog is visible
Turn Off HibernationAccess settings via [Control Panel] [Power Options] [Hibernate] tab.Check or uncheck the box to set activation property
Multiple Users and Fast User Switching
A highly touted feature of XP is the ability to have multiple users logged on to one machine and switch quickly between them. Like Windows 2000, this is certainly possible, but is it really a very worthwhile feature? The theory behind it is if you step away from the computer and somebody else wants to use it in your absence, they can sign in to their own settings without closing the programs you are running. The usefulness of Fast User Switching really depends on the type of work you do, how long each session lasts and how many users access each machine. Bear in mind that each additional user logged in is going to eat away at overall performance, especially if resource intensive programs are being run by multiple users.
To activate Fast User Switching:
Log in as Administrator[Start] [Control Panel] [User Accounts][Change the Way Users Log On and Off]Click [Use Fast User Switching]then click [Apply Options]Fast User Switching is now enabled.
To change users, click [Start] [Log Off] and [Switch User] when the [Log Off Windows] selection box appears.To log yourself off and leave the computer available for another user to log on, click the [Log Off] button. The Log On screen with the available users will be displayed.
Fast Boot /Fast Resume Design
Customer research shows a frequently requested feature that users want from their PCs is fast system startup, whether from cold boot or when resuming from standby or hibernation. The Windows development team at Microsoft has taken bold steps in making fast startup PCs a reality with the Microsoft® Windows® XP operating system. The design goals for Windows XP on a typical consumer PC are:
1. Boot to a useable state in a total of 30 seconds
2. Resume from Hibernate (S4) in a total of 20 seconds
3. Resume from Standby (S3) in a total of 5 seconds
Boot and resume times are measured from the time the power switch is pressed to being able to start a program from a desktop shortcut.Note: The link above provides access to the BootVis.exe Tool, a performance trace visualization tool for use with Windows XP systems. Highly recommended to help in understanding the boot process of the XP box
Create Icons for Shutdown and Reboot
If you find it annoying to access the Start Menu for shutting down or rebooting the computer, create a shutdown and reboot icon for the desktop.
Desktop Shutdown IconRight click on the desktop:
Click [New] [Shortcut] to open the Create Shortcut WizardType [shutdown -s -t 00] without the brackets.
Click [Next] and type a descriptive name of your choosing for the shortcut
Click [Finish]Add a bit of class to the shortcut by assigning it a custom icon.Right click the shortcut, click [Properties] and select the [Shortcut] tab.Click [Change Icon] and select from the icons that are displayed.
Desktop Reboot IconRight click on the desktopClick [New] [Shortcut] to open the Create Shortcut WizardType [shutdown -r -t 00] without the brackets.
Click [Next] and type a descriptive name of your choosing for the shortcutClick [Finish]Add a bit of class to the shortcut by assigning it a custom icon.
Right click the shortcut, click [Properties] and select the [Shortcut] tab.
Click [Change Icon] and select from the icons that are displayed.A Final Note:If you happen to be as fanatical as I am about having nothing on the desktop, drag the new icons into the Quick Launch area of the Taskbar
Auto Disconnect for Internet Explorer
Use this edit to automatically disconnect from Internet Explorer after a specified length of time has elapsed.
[Start] [Run] [Regedit]Registry Key: HKEY_LOCAL_MACHINE\System\CurrentControlSet\Services\LanmanServer\ParametersModify/Create the Value Data Type(s) and Value Name(s) as detailed below.Data Type: REG_DWORD [Dword Value] // Value Name: AutodisconnectValue Data: [Enter a new disconnect time. Use Hexadecimal if you are unfamiliar with Binary]
Exit Registry and Reboot
Create Password Reset Disks
The Forgotten Password Wizard allows you to create a password reset disk that can be used to recover user account and personalized computer settings if the password is forgotten.
The steps to perform this task differ for domain and workgroup scenarios.
Domain Password Reset DiskPress CTRL+ALT+DELETE to open the Windows Security dialog box.
Click Change Password.Click Backup to open the Forgotten Password Wizard.
Click Next and then follow the instructions as they appear on the screen.Non-Domain Password Reset DisksThe procedure for creating non-domain reset disks varies depending on whether you have an administrator account or a limited account.
Administrator Password Reset Disk[Start] [Control Panel] [User Accounts]Select the account name.Click [Prevent A Forgotten Password] under Related Tasks on left of screen.Follow the instructions in Forgotten Password Wizard.Limited Account Password Reset Disk[Start] [Control Panel] [User Accounts]Click [Prevent A Forgotten Password] under Realted Tasks on left of screen.Follow the instructions in Forgotten Password Wizard.
change fat —> ntfs
To change ur File system from command prompt type: convert c:/fs:ntfs
(ex:’c’ is the drive letter)
Turn Off Autoplay for Program CDs
How can you stop Windows XP from launching program CDs?·
Click Start, click Run, type GPEDIT.MSC to open Group Policy in the MicrosoftManagement Console.
Double-click Computer Configuration, double-click Administrative templates,double-click System, and then click Turn off autoplay.
The instructions on your screen describe how to configure this setting.
ClickProperties to display the setting dialog.·Click Enabled, and choose CD-ROM drives, then click OK, to stop CD autoplay.
This setting does not prevent Autoplay for music CDs
Make your folders invicible
1)Right Click on the desktop.Make a new folder
2)Now rename the folder with a space(U have to hold ALT key and type 0160).
3)Now u have a folder with out a name.
4)Right click on the folder>properties>customize. Click on change icon.
5)Scroll a bit, You should find some empty spaces, Click on any one of them.click ok
Q:
Every once in awhile, my iTunes music skips. It’s fine when I’m listening to the music on my iPod, but if I’m just using my computer, it all skips. What’s going on?
A:
Well, first of all, that’s an excellent question. Many of us have turned to the iTunes way of listening to music, when before, we may have used Windows Media Player or Winamp. Switching over to iTunes makes perfect sense too. It holds a lot of music files, it’s easy to use and if you have an iPod, you can transfer your music in a matter of seconds.
Okay, so we have established that iTunes is a great musical discovery, but it leaves much to be desired when it starts to skip. Nobody likes to listen to their music with a bunch of stutters in between, am I right?! So, let’s look at some reasons why iTunes might be doing this.
To begin, you’ll want to check and see how much RAM you have on your computer. Depending on how many songs you have in your iTunes library, it is a very memory hungry program. If you don’t have enough RAM to support all you’re doing on your computer at the time, it’s going to start skipping and you won’t be able to fully enjoy your music. Now, if you close out every other application you’re using, along with your iTunes, it might work properly. You can use the task manager to shut down the other programs to see if that stops the skipping, but that’s not really too convenient for anyone.
When we’re listening to our music, we’re usually doing something else as well, like playing a game or working on a document. If you’re doing something away from your computer and just want the music to keep you company, then this suggestion makes sense, but otherwise, it may not work for you. You may just have to break down and have some more RAM installed on your PC. But, before you do that, let’s look at one other option you might be able to take advantage of.
A lot of times, the skipping problem lies within the QuickTime program that you need to have in order for iTunes to work. There are a couple settings you can change in QuickTime to combat the stuttering issue. To do this, make sure your iTunes is shut down and go to Start, Control Panel. Once in there, double click on the QuickTime icon. (You must be in the classic Control Panel view for this to work).
Once you’re there, use the drop down menu at the very top of the dialogue box and choose Sound Out. This will allow you to work within the sound output elements of the QuickTime program.
Now, under the choice that says “Choose a device for playback,” use the drop down menu and select “waveOut.” You can then just close the QuickTime window. You don’t need to press OK or anything, just completely close it out.
Next, restart your iTunes and your skipping problem should be solved. You can start listening to your music again, while doing your other work as well, without any further problems. Like I said before, you should try this little suggestion before you go out and get more RAM, but if the problem persists, that may be just what you’ll have to do. Either way, it’s worth it for your music, right?!
A Sticky Highlighting Key
I’m sure you’re aware of the wonders of the Shift key when it comes to mouseless highlighting, but are you one who isn’t so great with key combinations? I mean, all those keys at once is just not something you’re good with, but on the other hand, you’d still like to use your keyboard more and the mouse less.
If that’s an accurate description for you, I may have an alternate to the Shift key that gets the job done just as well!
Instead of the old Shift + arrows (or whatever key you’re using to move around the file), try the F8 key instead.
Yep, that’s the whole trick: the F8 key.
Once you hit this key, the highlighting function is active and you don’t need to keep holding down the key.
First, place your cursor at the beginning of the section to be highlighted, just hit F8 once, let it go and then use the directional keys (arrows, home, end, page up and page down) to highlight.
The highlight is “anchored” to the location of the cursor when you hit the F8 key and from there, you can highlight in any direction.
When you no longer need the highlight or need to move the “anchor” position, just hit the Esc key.
Instantly, the highlight feature will be turned off and you’re back to work as usual!
Lost Documents
Have you changed your Internet Service Provider (ISP) lately? If so, during the transition, did you happen to lose some e-mails you wanted to keep? Or, how about this: you downloaded or saved a document and for the life of you, you can’t find it on your PC. Either way, don’t panic, because all is not lost! Actually, nothing is lost, because your documents are there somewhere. It’s just a matter of knowing how and where to look for them.
Awhile back, my daughter did not come home from school at her usual time. I called the school, which called her bus and they reported that she had never gotten on the bus. She was missing. So, in working with the school and the local police department, we started looking for her in the places where she ought to be (for example, the school, our street, etc). We then expanded our search to places she was not expected to be, but might have wound up for some odd reason (like the recreation center). Now, please note that I only use her as an example here, because she did in fact arrive home safe and sound later on.
This relates back to your documents (be it an e-mail, a document you downloaded from the Internet or an e-mail you received) in that neither my child nor your documents have vanished off the face of the earth. Sometimes documents (and people) just wind up in odd places!
Unless you’re using a Web based e-mail account (like Google, Hotmail or Yahoo!, for example), you probably have a POP (Post Office Protocol) e-mail account. There are tons of wonderful technical explanations in books and on the Web about how this works, but all you really need to know for our purposes here is that if you use a Web based account, your messages are stored on the Web, whereas with a POP account, they are probably stored on your PC. That way, you can still view them offline.
This also means that they are still somewhere on your PC, even if you change your service provider. For example, when I switched from Infinet to Time Warner Cable, I wasn’t readily able to see my old e-mails from the Infinet account anymore. And that became a big problem when years later, I needed something from them.
The method for recovering lost POP e-mails is the same as the method for recovering missing documents, so let’s address that first. I used this method when a spreadsheet a co-worker had created for tracking certain statistics at work was saved, but no one could find it.
Now, when my daughter went missing, we started looking in the places we thought she ought to be and you do much the same with a missing document. Did you save it in your My Documents folder? Did you save it on your desktop? Did you save it on the C: drive? Is it on an auxiliary storage device, like a flash drive or CD ROM? Once you’ve ruled out the places it could have gone, you’ll have to expand your search, but just like it wasn’t practical for the people looking for my daughter to ask every single girl in every single business in town if she was my daughter, you don’t want to start opening every single folder on your hard drive. Some of them aren’t even easy to find. They’re just in strange places, like subfolders of subfolders and with names like “XZH67FGHY.” Don’t ask me why!
I had to give the police a description of my daughter (height, hair color) so that they would know what to look for. You also have to give your computer a description of what you’re looking for. Luckily, there’s a place to do that and an easy way to do that. Let’s check it out!
Click on Start and choose Find (or it might say Search).
Next, choose Files or Folders.
Patience will be a virtue here. Unless you remember the exact name of your document, you’re going to have to employ a few ways of describing your document. Let’s start by assuming you are looking for a Word document. First, check the Look in field to make sure it’s set to search the entire hard drive (C:), just like above. If it’s set for the A: drive (floppy) or Documents, for example, your computer will only look in those places and you’ve already looked there, so it would just be wasting your time.
In the Named field, you really don’t have to have the exact name of your document. For example, I’ve called this document “Wherefore Art Thou,” so let’s look for anything with “Wherefore” in the title. But, and this next part is important, since you’re not searching for an exact title, you want the computer to find anything that has that word in the name. This is critical when you’re looking for a document with a name you’re unsure of. You do this by adding *.* at the end of your search term. This tells the computer to search for anything that has this word anywhere in the document name. Let’s try to find this document.
Notice how I’ve typed the description into the Named field. Next, click Find Now.
Looky there! It found it. You can now open that document by double clicking on its name.
Now, what if you don’t know the name of the file? What if you’re looking for an Excel spreadsheet that was saved before it got a proper name or maybe it was downloaded from an e-mail and you don’t know where it went?
Well, you can find types of files by using the same Named field, but instead of putting in a description of the document name, you can put in a description of the document type. You can do this by clicking on the Advanced tab in the Find All Files box and choosing your file type from the drop down menu.
Let’s see if I have any kicking around.
Quite a few, it turns out! It’s just a matter of checking the most likely ones out to see where the one you want is.
Now, it’s time to find a lost e-mail. Let’s say I was looking for an old Infinet e-mail (which had the extension of “infi.net” from my friend Sam).
This time I’ve chosen E-mail File from the drop down list:
’ve also gone back to the Name and Location tab and entered “Sam” into the Containing Text field, because more than likely, the e-mail is probably not named “Sam,” but it will have his name in it.
Let’s see what we get!
I got nothing! Okay, I know they’re on there somewhere, so it’s time to expand the search some more.
To make a long story short, you will need to keep expanding your search until you start getting some hits. They are there, I promise! I finally just searched all file types for my old Infinet e-mail username “nealshaw” and take a look at what I found:
Seventy files! Most of them are cookies, but several are folders in which the e-mail I’m looking for probably lies. Here’s what I found in my Netscape Users folder:
Mail files, including the Sent ones, the Trash ones (the ones I thought were gone!) and of course, my old Inbox. When I double click on one of those, it will ask me which program I want to use to open them. There are a ton of e-mails stacked in there, it turns out, so I chose to use WordPad or Word. Please keep in mind that this can be a time consuming process, especially if you have a lot of files, etc. on your PC and have been using it for years, like I have. But, all in all, the files are there. If I still haven’t found “Sam” at this point, I can wait until the e-mails are all converted to a Word or text file and search the document with Ctrl + F. (They were in there, by the way!)
One final note: With all the stuff you’ve found in your search, it might also have occurred to you that there are some files you really want, but are gone. I’m sure you’ve heard by now that deleted files don’t just disappear, they get relegated to some far corner of your PC until they are overwritten. It’s sort of like if you have a CD ROM of embarrassing pictures you can’t stand, but your kids think are hilarious. You can’t just throw it away and hope they don’t find it before the trash pick-up day. You need to drive over it with your car a few times until it’s broken into small pieces!
If you find a file of old e-mails or other items you want to be truly gone, you will need to ensure that it gets overwritten multiple times. If that’s what you’re looking for, check out this Web site. A program called Scar 5 will overwrite your specified files about 25 times. It’s pretty near impossible to recover them after that! Do use this with caution, however. This is a case where you need to be very specific, because carelessness here could wipe out your hard drive.
My daughter was safe and sound on the bus she was supposed to be on. (The driver just hadn’t seen her). She didn’t drop off the face of the earth and neither did your files or e-mails. We found the Excel file at my job by doing a search for all Excel files and it tuned up in a folder with some name none of us had ever heard of before!
When you do download or save files, it pays to really pay attention where you are putting them. Downloads often wind up in temporary folders, which you can track down by searching files with “Temp*.*”, but it’s good to be a little more specific. You can also practice by trying to find all the pictures on your PC sometime by using the File Type drop down for JPEGs. Just a thought.
Happy computing!
Q:
Is there anything you can tell me about the Windows Vista Firewall? I just started using Vista and I’d like to use its firewall too, but I’m not sure how to access it or how to set it up right. Please help me!
A:
Excellent question! This is one that will surely help all you Windows Vista users out there. If you’re fairly new to the Vista operating system, you might not even know about the firewall that comes with it. Of course, if you know anything about Windows at all, you know that previous versions have always come with a firewall, so it should come as no surprise that Vista is equipped with one too. Now, just in case you’re not sure what a firewall is for, allow me to start with an explanation of that.
A firewall’s main purpose is to protect your computer from the outside world of viruses, spyware and other types of awful malware. It’s put in place to block all the “bad” stuff from your computer. (We have several tips on firewalls in our archives, so if you’re interested in learning more about them, you can always go and do a keyword search for them there). Along with having a firewall on your computer, you should also have an antivirus program and maybe even an anti-spyware application as well. Those programs and your firewall can then work together to keep your computer completely protected.
Now, you can get a firewall from other sources, but Microsoft makes it much more convenient by already including one with the Vista operating system. In order to use the Vista Firewall to its best ability, you need to make sure it is set up correctly. Once you do that, you’ll be well on your way to full protection. So, without further ado, let’s get your firewall up and running!
First, go to Start, Control Panel and click on the option that says “Check This Computer’s Security Status.” That will then bring up the Windows Security Center. The Vista Firewall is the first choice you’ll see in that list. Check to make sure the firewall is set to On. If it’s in the Off position, just click on the Windows Firewall link and then go to Change Settings. From there, select the On option and then press OK.
Alright, you now have your firewall turned on, which is the most important thing! Now, as things stand right now, the firewall is blocking all of your programs, which I’m sure is not the way you want to keep things. So, the next thing you’ll want to do is create some exceptions for the programs you want to allow through to your network. These can include any of the applications you use on a regular basis or any Web sites, etc. you like to visit when you’re connected to the Internet. Here’s how you can create the exceptions you want.
There are actually two good ways you can do this. First, whenever the Vista Firewall blocks one of your programs, Web sites, etc., you can just hit the Unblock option from the pop up menu. Second, you can go to the Exceptions tab in the Vista Firewall dialogue box and set up a program exception from there. The easiest way to do this is to just let the program ask you what you want to do with it, but there may be times when you’ll need to go in and manually make some exceptions yourself.
So, if that ever happens to you, here’s some more detail on how to get that done. Go to Start, Control Panel and then choose the Security section. From there, click on the option that says “Allow a program through Windows Firewall.” Next, click on the Exceptions tab and then the Add Program button. Once that window comes up, select the program you want to allow. You can click on the Browse button to search through them if you need to as well. Once you have the program selected, click Change Scope and then choose the settings you’d like to have for that particular program. You can then go and make exceptions for your other programs if you need to as well.
There’s the basics for you! Now, there’s always been some debate about how secure the Windows Firewall really is and of course, there are other firewall programs you can use to protect your computer, but if you’re just getting started with Vista, this firewall will do just fine. It will at least get you up and going and once you learn more about the different firewalls that are available, you can make your decision from there. Either way you go, just make sure you do have a firewall enabled on your computer. It’s there to protect you and you can’t argue with that. Check it out!
One Key Duplications
Ever have a picture or drawing object that needs to be duplicated in a file?
What did you do?
Did you continue to draw the object or did you insert the picture over and over again? (Boy, I hope not, because that’s the most time consuming method!)
Or, maybe you selected the item (drawing object or picture), copied it (Copy button, Ctrl + C or Edit menu/Copy selection) and then pasted the item (Paste button, Ctrl + V or Edit menu/Paste selection).
And last, maybe you found the shorter version of selecting the object by pressing Ctrl + D.
This one isn’t so bad, but there is a drawback to both of these methods. The new duplicate item goes over top of the first one. (Well, not directly over. It’s slightly to the right and down, partially covering the original).
Either way, that all sounds like a big pain, doesn’t it?!
So, wouldn’t it be nice to make a copy of the item exactly where you need it, without the automatic need for positioning after you complete the duplication?
Yeah, I thought so (or at least I thought it would be a handy skill to have).
Well, this is a one step duplication and positioning trick.
- First of all, you’ll need to select the item you want to copy.
- Next, hold down the Ctrl key.
- Finally, click on the item, hold and drag the object to its new position.
You should have the original picture or drawing still in its original place and a new, perfect duplicate in the place where you just positioned it.
Voila! Now you can copy, paste and position with just one maneuver.
Now, if only I had a way to dust, vacuum and do dishes simultaneously!
Q:
I can’t seem to find a particular font I’d like to use. Is there an easy way I can search for it without having to sample every font I have on my computer? Please help!
A:
This one’s an oldie, but it’s definitely a goodie!
Yes, there most certainly is an easy way to do that. Here’s how you can look for the fonts you love, as well as, search for others that are similar to the one that’s “almost” perfect. Just follow these directions:
1.) Go to Start, Control Panel (make sure you’re in the classic style) and then open the Fonts folder.
Note: For those of you who use a Windows version older than XP, you may need to click the “View all Control Panel options” link that’s on the left hand side of the Control Panel.
2.) Next, go to the View menu and select “List fonts by similarity.”
That’s it. Now, just use the “list fonts by similarity to” drop down box to select the font you’re looking for or others that are similar. You’ll get a list in descending order of similarity. Once you find what you’re looking for, double click it to see a sample
No comments:
Post a Comment